> ## Documentation Index
> Fetch the complete documentation index at: https://docs.der-connect.dev/llms.txt
> Use this file to discover all available pages before exploring further.
# Connect to an electric vehicle
> Get access to vehicle readings, control charging, and list charge sessions.
## What you'll need
* A valid access (bearer) token
* The vehicle's identification number (VIN) and its brand
* A way to reach out to the vehicle's owner for consent
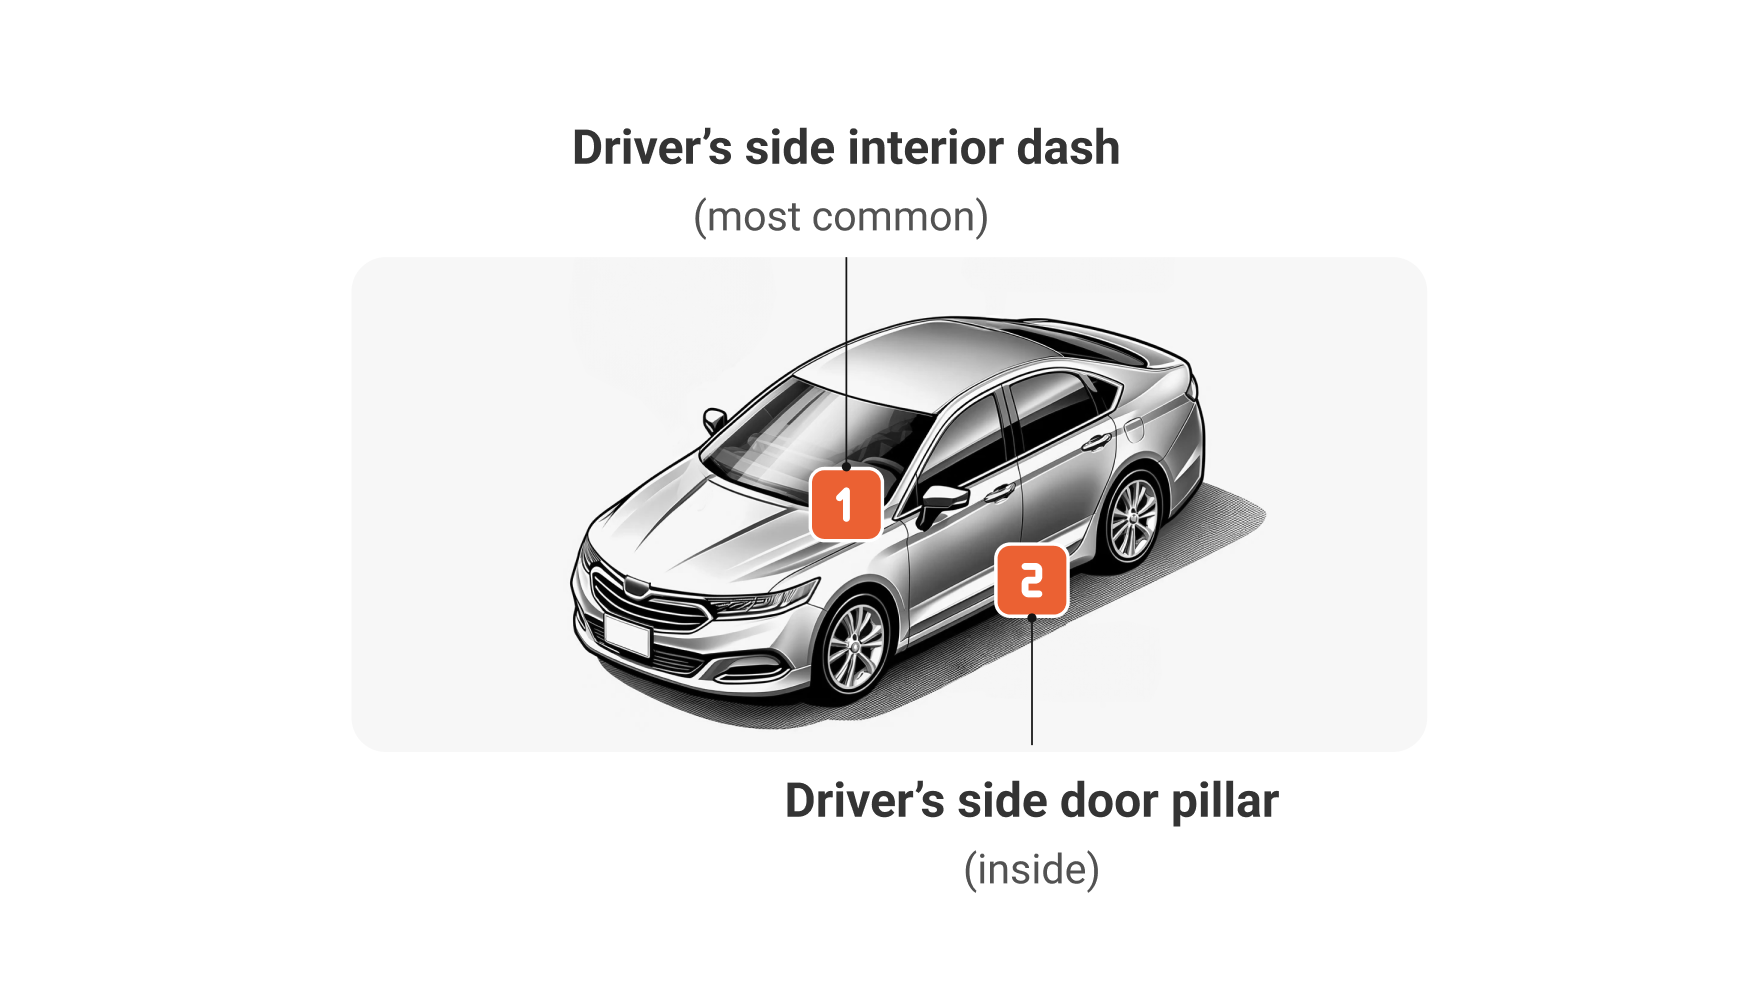
### Locating the VIN
 ## Let's get started
Create an [Entity Onboarding Request](/api-reference/endpoint/onboarding-api/onboard-entities/create-an-entity-onboarding-request), setting the type to `EV`.\
You'll need to specify a supported brand and the VIN as a unique device identifier.
[List all available brands Entity types](/api-reference/endpoint/onboarding-api/onboard-entities/retrieve-available-entity-brands-and-types) to learn about the available options.
EVs are identified by their VIN (Vehicle Identification Number).
In most cases, the onboarding request will have the status `Pending` until a required action is completed.
How an action should be completed, depends on its type.
* Actions of type `Redirect` (most common) contain a redirectLink. You can redirect your user here or share this link directly with the vehicle's owner to complete the action.
* Actions of type `Consent` have to be completed through the vehicle manufacturer's app or by responding to a notification. They also contain a documentationLink for more information on how to complete the action.
```json Response (Body) [expandable] {3, 5-8} theme={null}
{
"id": "3c90c3cc-[....]-8dd25736052a",
"status": "Pending",
"requestType": "Entity",
"action": {
"type": "Redirect",
"redirectLink": ""
},
"data": {
...
}, ...
}
```
Available options: `Consent`, `Redirect`
A link to redirect the user to complete the action.
A link to our documentation, explaining the user how to proceed.
Periodically poll the Onboarding API to check if the status of your request has updated to `Succeeded`. Once it's complete, you'll find the newly created Entity and its ID in the data object.
You can reference the entityId when using our Readings API, Commands API, and our Charge Sessions API.
```json {3, 6} theme={null}
{
"id": "3c90c3cc-[....]-8dd25736052a",
"status": "Succeeded",
"data": {
"entity": {
"id": "3c90c3cc-[...]-8dd25736052a",
...
},
}, ...
}
```
## Work with your newly created Entity
**Tip:** Take note of your Entity ID before you get started with our APIs.
Observe the state of the vehicle.
Send charging instructions.
See when the vehicle charged.
```json Onboarding Request (Body) {4} theme={null}
{
"type": "EV",
"brand": "Tesla",
"identifier": "1ABC36600TL029015",
}
```
## Let's get started
Create an [Entity Onboarding Request](/api-reference/endpoint/onboarding-api/onboard-entities/create-an-entity-onboarding-request), setting the type to `EV`.\
You'll need to specify a supported brand and the VIN as a unique device identifier.
[List all available brands Entity types](/api-reference/endpoint/onboarding-api/onboard-entities/retrieve-available-entity-brands-and-types) to learn about the available options.
EVs are identified by their VIN (Vehicle Identification Number).
In most cases, the onboarding request will have the status `Pending` until a required action is completed.
How an action should be completed, depends on its type.
* Actions of type `Redirect` (most common) contain a redirectLink. You can redirect your user here or share this link directly with the vehicle's owner to complete the action.
* Actions of type `Consent` have to be completed through the vehicle manufacturer's app or by responding to a notification. They also contain a documentationLink for more information on how to complete the action.
```json Response (Body) [expandable] {3, 5-8} theme={null}
{
"id": "3c90c3cc-[....]-8dd25736052a",
"status": "Pending",
"requestType": "Entity",
"action": {
"type": "Redirect",
"redirectLink": ""
},
"data": {
...
}, ...
}
```
Available options: `Consent`, `Redirect`
A link to redirect the user to complete the action.
A link to our documentation, explaining the user how to proceed.
Periodically poll the Onboarding API to check if the status of your request has updated to `Succeeded`. Once it's complete, you'll find the newly created Entity and its ID in the data object.
You can reference the entityId when using our Readings API, Commands API, and our Charge Sessions API.
```json {3, 6} theme={null}
{
"id": "3c90c3cc-[....]-8dd25736052a",
"status": "Succeeded",
"data": {
"entity": {
"id": "3c90c3cc-[...]-8dd25736052a",
...
},
}, ...
}
```
## Work with your newly created Entity
**Tip:** Take note of your Entity ID before you get started with our APIs.
Observe the state of the vehicle.
Send charging instructions.
See when the vehicle charged.
```json Onboarding Request (Body) {4} theme={null}
{
"type": "EV",
"brand": "Tesla",
"identifier": "1ABC36600TL029015",
}
```